
Build a workbench for the work you do every day
Tell your Agent what you need, and it builds a small app just for your space, with its own pages and data that stays put. You can change it, share it, and take it to a new computer.
Some work isn't a one-off. You keep coming back to it, adding to it and checking on it. For example:
- If you run an online shop, you want to see how much of each product is left, and know when to restock.
- If you work out, you want to log every session, track your weight, and look back at the week.
- If you invest, you follow a batch of companies, note every call, and plan the next step.
A spreadsheet works for a while, then gets messy. That's what a workbench is for. Describe the job to your Agent, and it builds a small app in your space, with its own pages, buttons and data. The data is saved on your computer, so it's all still there next time.
A workbench lives in your space, next to your files, browser and chat. You can look at your data while your Agent helps out.
The examples on this page follow Alex, who runs a small online shop and had the Agent build a Stock tracker.
Create a workbench
Click New workbench on the space's new task page
Open the space the workbench belongs in and start a new task. Under the message box there's a New workbench button. Click it and a request is filled into the box for you.
Add your details and send it
After the request, describe what you're keeping track of and how you usually do it. Alex wrote: "I have 24 products. Remind me to restock when one drops below 5, and keep each supplier's contact details." The more specific you are, the better it fits.
Answer your Agent's questions, then let it build
Your Agent checks your needs and process with you first, then starts building. A workbench takes a little while to make, so feel free to do something else.
When it's done, the workbench opens next to your chat by itself.
While your Agent is building, you'll see each step it takes in the chat. You don't need to understand them. Just wait for it to finish, or for it to ask you something.
Don't have a space for it yet? Click My in the sidebar, open the Workbenches tab, and click Create workbench at the top right. Floatboat creates a space called New Workbench and fills in the request for you there, too.
Open your workbench
Once it's built, a button with the workbench's name appears under the space in the sidebar. Click it, and the workbench opens next to your chat.
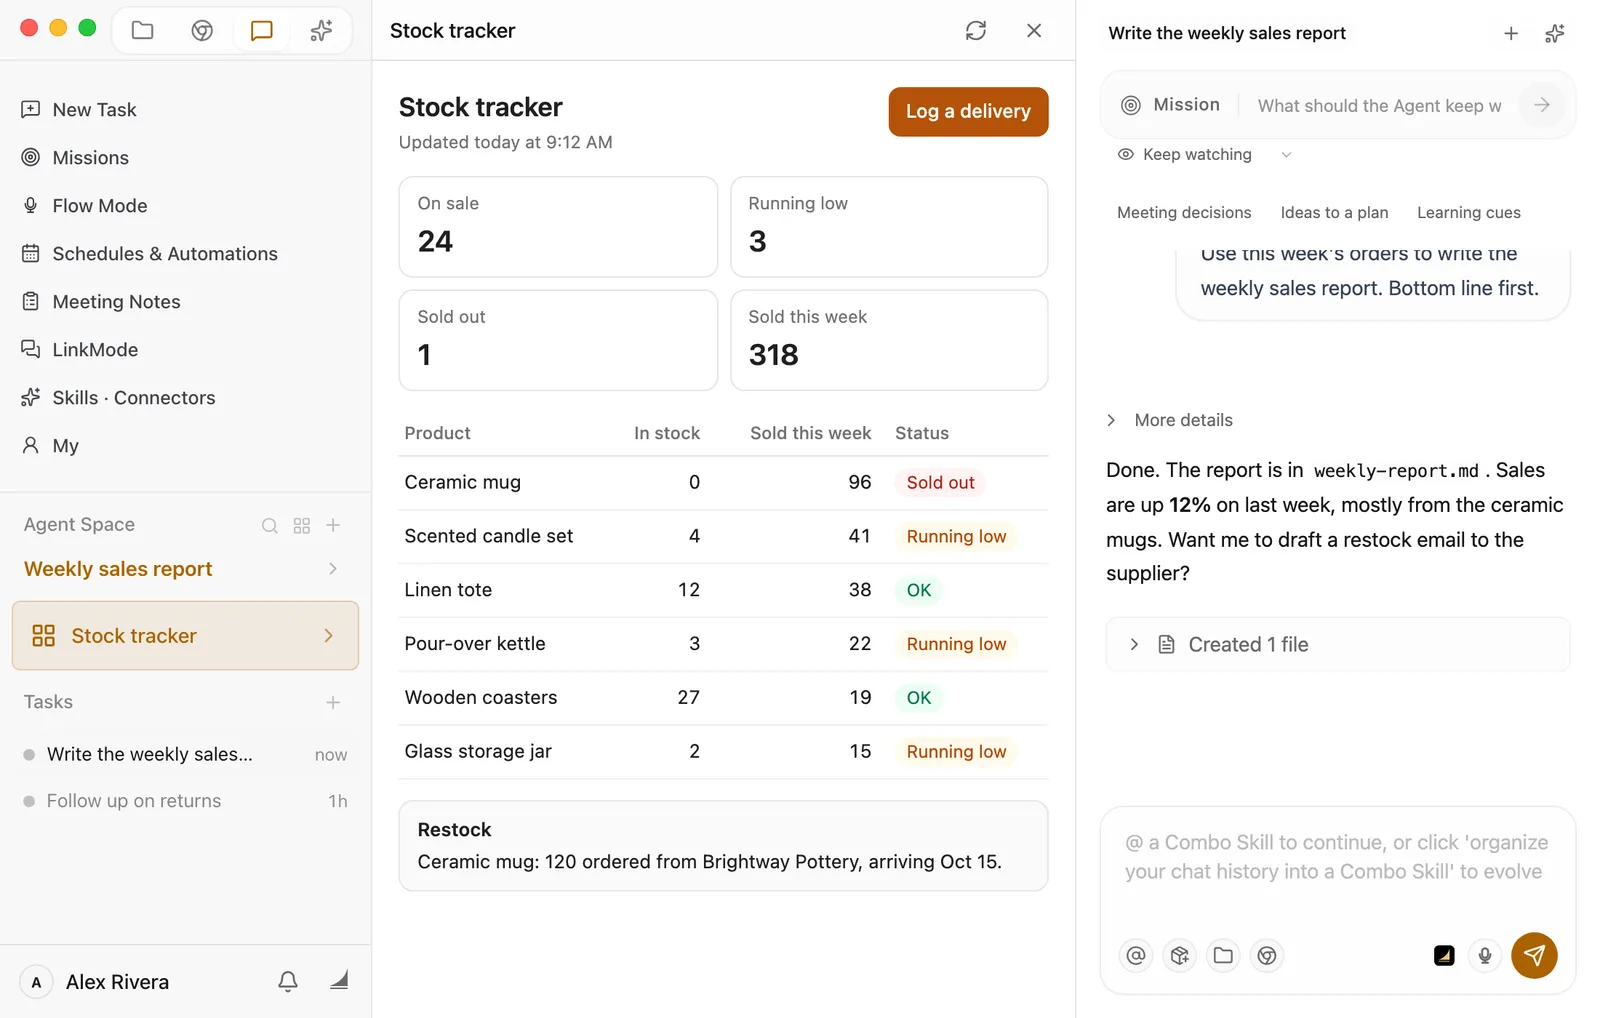
- The buttons and tables inside are whatever your Agent built for you, so every workbench is different.
- The refresh button at the top right reloads the page. If something looks off, try that first.
- The close button only hides the column. The workbench keeps running in the background. Click the sidebar button to bring it back.
You can also open it from My: find its card on the Workbenches tab and click the arrow at the card's top right. Floatboat switches to its space and opens it.
Use it day to day
A workbench isn't a picture. It's a working app. Click its buttons, fill in its forms, and the numbers update right away.
When a delivery of mugs came in, Alex clicked Log a delivery, picked the product, typed the quantity, and saved:
- What you enter is saved on your computer. Close the column, quit Floatboat, come back tomorrow: it's all still there.
- The supplier filled in by itself because Alex asked for it when the workbench was built. What a workbench can do depends on what you asked for.
What a workbench can use
Besides its own pages and data, a workbench can use some of what Floatboat can do. Just tell your Agent what you'd like when you create or change it:
- AI models: summarize, sort or rewrite what you've entered. For example, "Add a button that turns today's deliveries into a short note."
- Agent tasks: hand a bigger job to an Agent from inside the workbench.
- Speech recognition: talk instead of type, like dictating notes.
- Workflows: run a Workflow you already have, such as "Daily order roundup".
- Connected services: use the accounts you've connected in Floatboat.
- Calendar and automations: add events to your calendar, or set up tasks that run on a schedule.
Anything that uses AI models or Agent tasks uses Credits, the same as chatting.
Ask your Agent to change it
After using it for a while, maybe you want another column, a different button, or a new way of counting. Start a new task in that space. The button under the message box now says Edit workbench. Click it, add what you'd like changed after the request, and send it.
Your Agent looks over the current workbench, checks the changes with you, then makes them. The data you've already entered stays.
Alex wanted a column that says how many to reorder:
The more specific you are about what to change, the closer it gets on the first try. If it's not quite right, say what's off in the same chat and your Agent will keep adjusting.
Manage workbenches under My
Click My in the sidebar, then the Workbenches tab. It lists the workbenches from all your spaces.
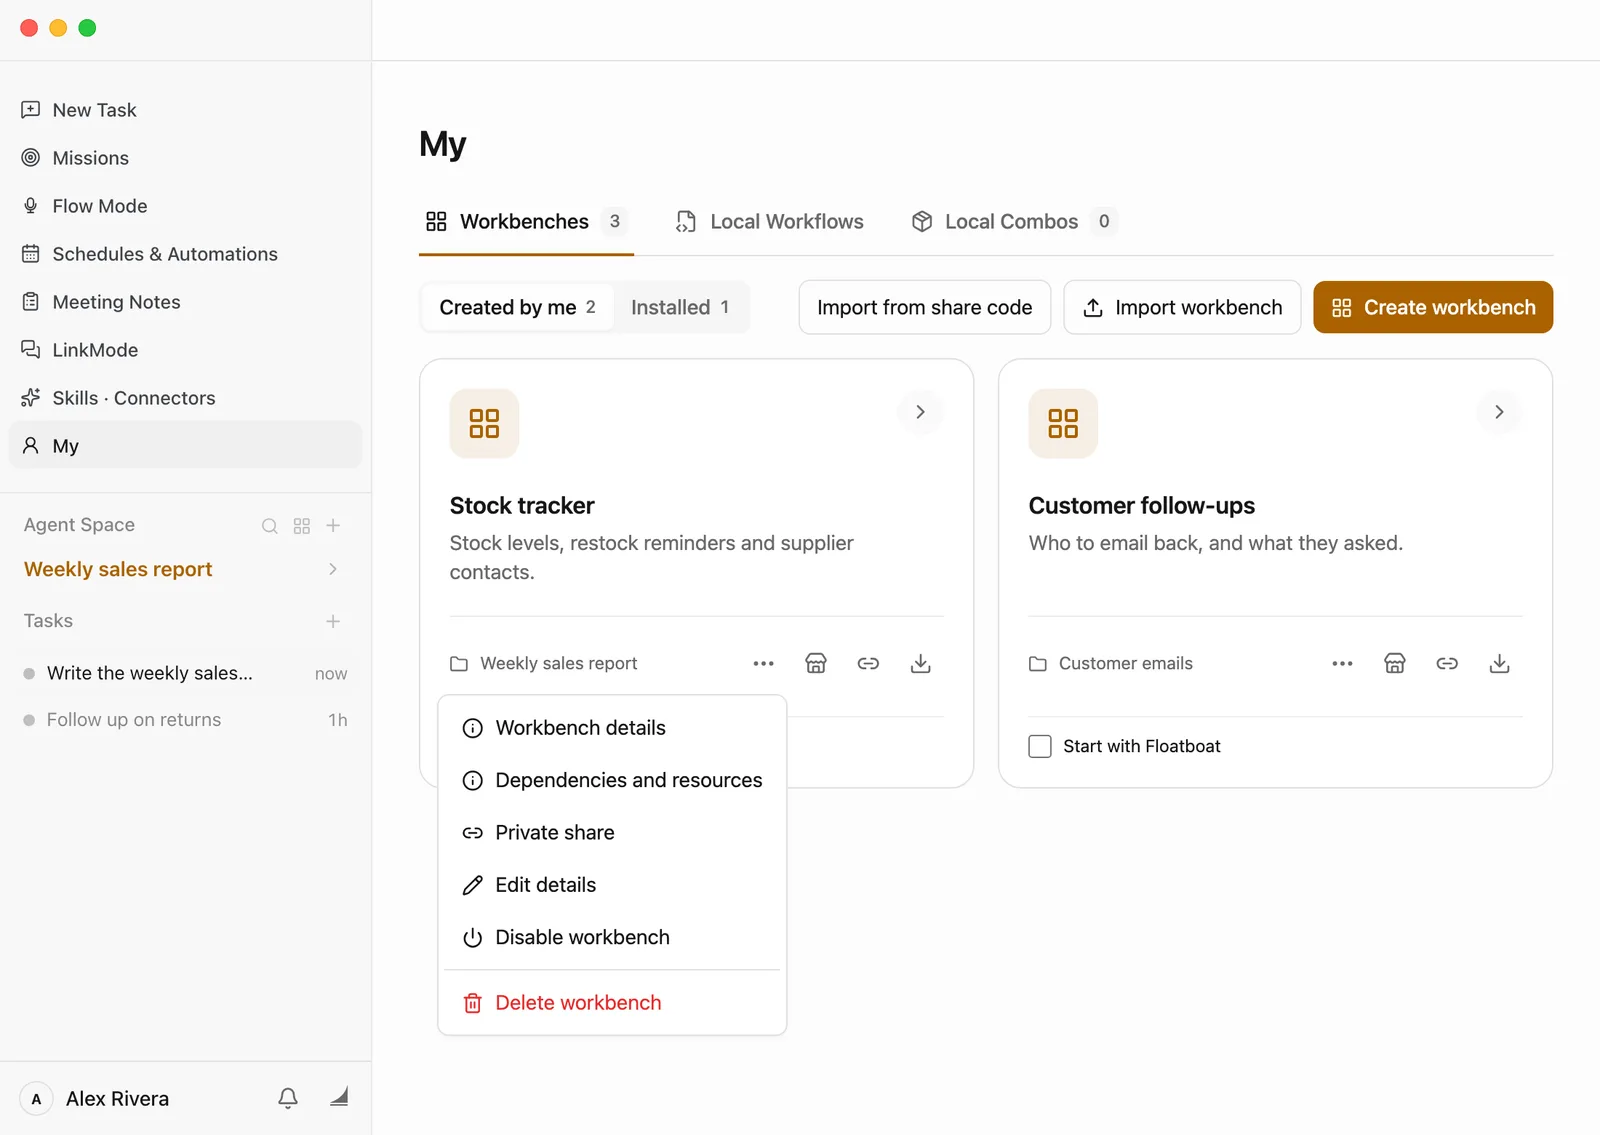
- Created by me holds the workbenches your Agent built for you. Installed holds ones from the Store, from a share code, or imported from a file.
- The bottom of each card shows which space it's in.
- Tick Start with Floatboat and that workbench starts whenever you open Floatboat, without waiting for you to open it.
The ellipsis menu on a card:
- Workbench details shows the name, version, which space it's in, and where its source and data are saved on your computer.
- Dependencies and resources shows which Workflows, Combo Skills and folders it uses. Anything missing is marked Needs configuration; you can sort it out here.
- Edit details changes the name and description.
- Disable workbench stops it for now and keeps all its data. Come back and click Enable workbench to use it again.
- Delete workbench takes it off the list. By default its source and data are kept. Only if you tick Permanently delete source files and business data are they deleted, and that can't be undone. Either way, your space and chats stay.
Share it with someone
To give a workbench to a coworker or friend, click the link icon, Private share, on its card:
Pick how long the code works
Set Link expiry to 7 days, 30 days or Never.
Decide whether to include your data
By default you only share the app, so they get an empty workbench. Tick Also share the data inside to send your current data along too. You'll also need to tick I understand they'll get a new workbench that includes this data.
Click Generate share code, then Copy share code
Send them the code.
Once they're signed in to Floatboat, they go to the Workbenches tab under My, click Import from share code, paste it, click Preview workbench, then Install in a new workspace. They get their own copy in a new space. After that, changes to one copy don't affect the other.
Move to a new computer, or keep a backup
Click the download icon on the card, Export workbench, to save it as a file. If you're moving computers, tick Include business data so your data comes along. The export is the last version that ran successfully; changes still being made aren't included.
On the new computer, open the Workbenches tab under My, click Import workbench, then Select workbench file. Give it a New workspace name, click Import workbench, and when it's done click Open workbench.
After importing, reconnect any accounts the workbench used. If it used folders on your old computer, choose them again under Dependencies and resources.
Install ready-made workbenches from the Store
Click Skills · Connectors in the sidebar to open the Combo Skills Store, then click the Workbench tab at the top.
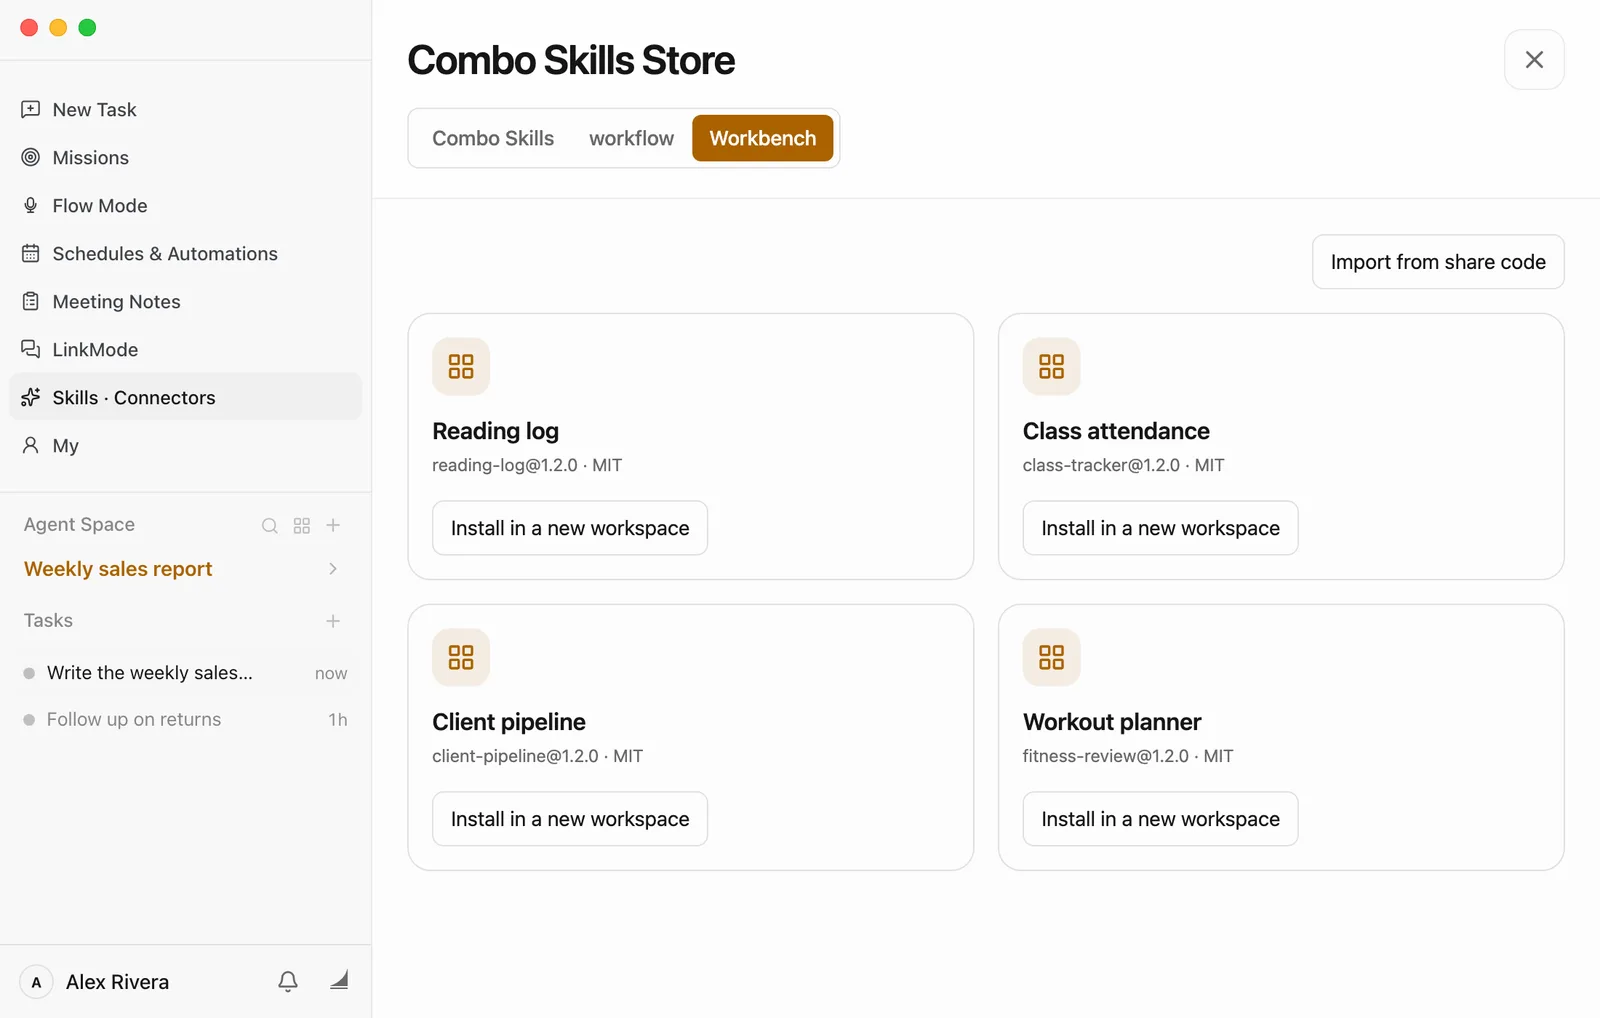
When one looks useful, click Install in a new workspace. Floatboat creates a space for it, and once it's installed the button changes to Open workbench. Want a second, separate copy? Click Install another copy next to it.
Some workbenches cost Credits. After you click install, Confirm paid content shows the price, and nothing is charged until you click Pay … Credits. A version you've bought stays with your account, so if the download fails you can just try again without paying twice.
Built something you think others would like? Click the store icon on its card, Publish to store, to send it for review. Once approved, other people can install it from the Store.
Something not working?
- There's no New workbench button on the new task page. Make sure you're signed in and online, then open the space again.
- The workbench says "Some dependencies or resources need configuration before opening." Click Dependencies and resources below it, fill in the items marked Needs configuration, then open it again.
- It says "This workbench is disabled." Find it under My, open its ellipsis menu and click Enable workbench.
- The card says Unavailable or Workspace unavailable. The space it was in may have been deleted. If you exported this workbench before, use Import workbench to bring the file back into a new space.
- The workbench is blank, or shows the wrong thing. Click the refresh button in its title bar. If that doesn't help, start a new task in the space, click Edit workbench, and tell your Agent what you see.
- Installing from the Store says the network is unstable and the package couldn't be downloaded. Check your connection and click install again. You won't be charged twice for a paid one.
- It says the workbench has active tasks or is in use by another process. Let it finish what it's doing, then try again in a bit.
What's next
Let a Workflow run your routine jobs
Turn a job with the same steps every time into a Workflow. Run it with a click, or on a schedule.
Keep each project in its own Agent Space
Give each piece of work a space, with its files, tasks and workbench together.
Save what works as a Combo Skill
Save a task you're happy with as a Combo Skill, so you don't have to explain it again.
Let a Workflow run your routine jobs
Have your Agent turn a job with the same steps every time into a Workflow. Run it with one click, or let it run on its own every morning.
Give Floatboat tasks from your chat apps with Link Mode
Away from your computer? Send Floatboat on your computer a message from Slack, Lark, WeChat, and other chat apps, and get the results back in the same chat. Here's how to connect, how to use it, and how to control who can send it work.